This is the bonus episode.
If you've gone through the last 5 posts and have a functioning Shibboleth-Liferay Web SSO setup then you're ready for this step.
You'll need to un-deploy the extension you deployed in the last post.
Here's a page that has instructions on how to do so. It isn't like un-deploying portlets or hooks. Also, if you're un-deploying the extension in order to replace it with another, be sure to restart Liferay before attempting to install the replacement!
So at this point we have an Ext plugin that adds a new auto login module to the set already in Liferay. We have configured our portal-ext.properties to use it. All is well... until the IdP team decides to change the names of the attributes that pass the login data along. Now your code breaks because you have that value hard coded in your auto login class.
And as I've said before, nothing is worse than hard coded values. Nothing.
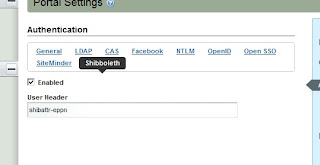
If you go into Liferay's Control panel and click "Portal Settings" from the menu at the left, and then choose "authentication" from the menu on the right, you will see a list of possible Web SSO providers to choose from, and you can choose whether each one is enabled or disabled. Wouldn't it be nice if Shibboleth were one of the options?
Well, it is on mine:
And now it can be on yours, too!
But first we need to revisit that Ext plugin we created in part 5.
You'll be adding two more classes which will be overriding existing classes in Liferay. Liferay stores settings for various elements of the portal in a value pair of classes called PropsKeys and PropsValues. We'll be overriding them both. The purpose of this is to make use of the "Enabled" and "User Header" settings when Shibboleth is selected from the Authentication menu, as pictured above.
"But wait!" You say. "My authentication module is already enabled! I've been using it! How can that be if I've never added this parameter before?"
The way the Liferay uses the auto login modules is by iterating through each of the modules you've enabled in your portal-ext.properties file if you've overridden that value, each time a user opens Liferay. If you look at some of the auto login classes already written in the Liferay source code, you'll notice that each class checks the value of its "Enabled" setting before doing anything else. In a sense, there's a sort of double layer of "on" switches for each of these auto login modules. Since the code we used in part 5 never checks the value of that setting, our module will always run when Liferay looks for it. We want our Shibboleth auto login module to work exactly like the built in modules so we want to match that feature.
In your Ext project, add a new set of folders under docroot/WEB-INF/ext-impl/src:
com/liferay/portal/kernel/util
And copy the PropsKeys.java class from the corresponding location in the Liferay source bundle into util.
What you'll see in this class is a VERY LONG list of public Strings being declared. Add these into it:
public static final String SHIBBOLETH_AUTH_ENABLED = "shibboleth.auth.enabled";
public static final String SHIBBOLETH_USER_HEADER = "shibboleth.user.header";
It doesn't matter where you put them, but since the variables are in alphabetical order I just kept to that approach.
Now you can save that class and add another folder set:
com/liferay/portal/util
also under /src.
From the corresponding folder in the source code, copy over the PropsValues.java file.
You'll see another long list of Strings, similar to PropsKeys. Add these lines:
public static final boolean SHIBBOLETH_AUTH_ENABLED = GetterUtil.getBoolean(PropsUtil.get(PropsKeys.SHIBBOLETH_AUTH_ENABLED));
public static final String SHIBBOLETH_USER_HEADER = PropsUtil.get(PropsKeys.SHIBBOLETH_USER_HEADER);
And save the file.
Now, we need to modify our ShibbolethAutoLogin.java file to make use of these parameters.
In the class variables section, add this line:
String userEmail = "";
We're making userEmail a class variable because we're going to need it inside try/catch blocks. Inside the login() method, under the line where you declared your String[] credentials, declare a new variable:
long companyId = PortalUtil.getCompanyId(req);
It's also a good idea to move the String[] credentials = null; line up to the top of the method now. Delete the old try{ and move it to the top of the method, right under the variable declaration.
The first thing we need to add inside our expanded try block is the check to see if the user has clicked the "Enabled" switch.
if (!PrefsPropsUtil.getBoolean(
companyId, PropsKeys.SHIBBOLETH_AUTH_ENABLED,
PropsValues.SHIBBOLETH_AUTH_ENABLED)) {
return credentials;
}
Note the use of the value pair coming from the two classes we modified earlier. Next, we set our userEmail variable to the value stored in Liferay's value pair:
userEmail = (String) req.getAttribute(PrefsPropsUtil.getString(companyId, PropsKeys.SHIBBOLETH_USER_HEADER,PropsValues.SHIBBOLETH_USER_HEADER));
The last change is a small one. Since we're always initializing userEmail when we declare it, in the if statement that comes next, rather than check for userEmail to be null, we just want to check that it's not empty. When you're done, your class should look like this:
public class ShibbolethAutoLogin implements AutoLogin {
private static Log _log = LogFactoryUtil.getLog(ShibbolethAutoLogin.class);
String userEmail = "";
public String[] login(HttpServletRequest req, HttpServletResponse res)
throws AutoLoginException {
String[] credentials = null;
long companyId = PortalUtil.getCompanyId(req);
try {
if (!PrefsPropsUtil.getBoolean(
companyId, PropsKeys.SHIBBOLETH_AUTH_ENABLED,
PropsValues.SHIBBOLETH_AUTH_ENABLED)) {
return credentials;
}
userEmail = (String) req.getAttribute(PrefsPropsUtil.getString(companyId, PropsKeys.SHIBBOLETH_USER_HEADER,PropsValues.SHIBBOLETH_USER_HEADER));
_log.info("User Login received:" + userEmail);
if (userEmail.equals("") || userEmail.length() < 1) {
_log.error("Invalid or missing user login information from Shibboleth");
_log.error("Data returned from attribute:" + userEmail);
return credentials;
}
credentials = new String[3];
User user = UserLocalServiceUtil.getUserByEmailAddress(PortalUtil
.getCompany(req).getCompanyId(), userEmail);
credentials[0] = String.valueOf(user.getUserId());
credentials[1] = user.getPassword();
credentials[2] = Boolean.TRUE.toString();
return credentials;
} catch (NoSuchUserException e) {
_log.error("No user found to match " + userEmail);
} catch (Exception e) {
_log.error(StackTraceUtil.getStackTrace(e));
throw new AutoLoginException(e);
}
return credentials;
}
}
Save the file, and you can now rebuild and re-deploy that plugin. Make sure you completely remove the old Ext plugin per the instructions on the link provided above!
We're not done yet. We need an interface that will let us access these variables. Create a new hook project. Here's a link to how to do it in case you've never created a hook before.
In your new hook project, create this folder structure under WEB-INF/:
jsps/html/portlet/enterprise_admin/settings/
From the corresponding folders in your Liferay source, copy the file authentication.jsp over.
Hate jsps? Yeah, me too. Maybe one day we can go in and convert this stuff into JSF. For now, we play the hand we're dealt.
What you'll see when you open this file is the code that sets up the Authentication settings in Portal Settings. At the top is yet another long series of variable declarations. Add these to the list:
boolean shibbolethAuthEnabled = ParamUtil.getBoolean(request, "settings--" + PropsKeys.SHIBBOLETH_AUTH_ENABLED + "--", PrefsPropsUtil.getBoolean(company.getCompanyId(), PropsKeys.SHIBBOLETH_AUTH_ENABLED, PropsValues.SHIBBOLETH_AUTH_ENABLED));
String shibbolethUserHeader = ParamUtil.getString(request, "settings--" + PropsKeys.SHIBBOLETH_USER_HEADER + "--", PrefsPropsUtil.getString(company.getCompanyId(), PropsKeys.SHIBBOLETH_USER_HEADER, PropsValues.SHIBBOLETH_USER_HEADER));
These declarations are referencing our friends, the value pairs in Liferay. At last we'll be writing code to set them.
Near the top of the HTML you'll see a <liferay-ui> tag with an attribute called "names." That attribute sets up the list of tab links to choose from in the menu. You should see the names of all the existing Web SSO providers. Just add "Shibboleth" to the end of the list.
Next, we see a series of <liferay-ui:section> tags. Each of these sections corresponds to one of the Web SSO providers. Add a new section to the end that looks like this:
<liferay-ui:section>
<aui:fieldset>
<aui:input inlineLabel="left" label="enabled" name='<%= "settings--" + PropsKeys.SHIBBOLETH_AUTH_ENABLED + "--" %>' type="checkbox" value="<%= shibbolethAuthEnabled %>" />
<aui:input cssClass="lfr-input-text-container" label="user-header" name='<%= "settings--" + PropsKeys.SHIBBOLETH_USER_HEADER + "--" %>' type="text" value="<%= shibbolethUserHeader %>" />
</aui:fieldset>
</liferay-ui:section>
And save the file. Now you can deploy your new hook!
When you go to set these values in the Shibboleth configuration in Liferay, they're pretty self explanatory. Just add the name of the Attribute or Header you're being sent from the IdP in the "User Header" box and make sure the "Enabled" box is checked. Save the values.
Now, if the name of the variable ever gets changed, you can just do a quick update right here! (Just make sure you've left yourself a way to bypass Shibboleth and login with Admin privileges without it!)
This has been a pretty complex undertaking and I have no doubt that I've left something out over the course of these 6 posts. Please don't hesitate to leave comments or contact me with questions, and if I've left any glaring holes in these procedures I'll add them in!
Edit: The complete code for this project can be downloaded as linked in the next post: Here
---
This project incorporates tools whose development was funded in part by the NIH through the NHLBI grant: The Cardiovascular Research Grid (R24HL085343)