If you're trying to run concurrent Tomcats in your Windows environment (and presumably, Linux as well, I'll let you know) there are plenty of helpful guides out there that will tell you how quick and easy it is...
The problem is they're making assumptions that may not be true.
1)They assume both of your Tomcats are the same version.
2)They assume both of your Tomcats have the same general structure.
If both of the above conditions are not true, then just setting CATALINA_BASE on the fly and changing a few port numbers is going to crash and fail.
Ask me how I know.
I'm experimenting with new ways to handle SSO with Liferay and my current model calls for a Liferay instance running in a Tomcat bundle along with a separate instance of Tomcat that is NOT running Liferay.
Instance 1: Tomcat 6.0.29 running Liferay 6
Instance 2: Tomcat 6.0.32
Go ahead and try to just set CATALINA_BASE when you start that second instance and see what happens.
*KABOOM*
The reason should be fairly obvious.
When Tomcat starts up, it looks at your environment variables to find CATALINA_HOME. Once it has that, it will use it to set up a few other things, like CATALINA_BASE. Most online guides will tell you that setting a new CATALINA_BASE as part of the startup script to point to the folders in the second instance of Tomcat will allow both instances to share CATALINA_HOME (because all those jars are expected to be identical) but have separate configurations (Like server.xml, where you'll be setting separate ports between instances.) The trouble is that as you can see above, these two Tomcats are running slightly different versions. Also, in a Liferay bundle there are a few other minor differences that will cause trouble is a non-Liferay Tomcat is trying to share resources.
That means you're going to have to completely separate the two.
This isn't hard, but you do have to be careful.
First, create a new environment variable. I called mine CATALINA_ALT. That should be set to the Tomcat home folder of your second Tomcat instance. (Just like how CATALINA_HOME is set to the tomcat folder for the first.)
Next, you'll have to edit the .bat files in the second Tomcat instance to use CATALINA_ALT instead of CATALINA_HOME. The files I modified to start with are startup.bat, catalina.bat, service.bat and shutdown.bat.
I used a global find/replace to change all occurrences of CATALINA_HOME to CATALINA_ALT. Then, I did the same thing to change all instances of CATALINA_BASE to CATALINA_BASEALT. It doesn't matter what you call them as long as they're different from the original and consistent with each other.
Next, go into your server.xml file and change all the ports to something different from the way they're configured in the first Tomcat instance. (For example, change the connector port 8080 to 8081.) Again, it's not as important what values you choose as long as they're different and internally consistent.
Now the two Tomcats will operate independently of each other. (It's okay that hey share the same JAVA_HOME variable, but if you're running some kind of setup where the Java versions also need to be different, then just create an alternate JAVA_HOME variable for the second Tomcat as well.)
This tactic can also be useful if you're running two separate Liferay instances where one of them has been modified through Ext plugins.
Now, ideally you'll want to go through and make sure that ALL of the .bat files are consistently using CATALINA_ALT and CATALINA_BASEALT in your second Tomcat instance's bin folder. This guide is just to give you a basic understanding of what's going on and what you'll need to do. These steps should also work for Linux except that you'll work with the .sh files instead of the .bat files.
Thursday, December 8, 2011
Friday, November 18, 2011
Liferay Portlet Build Numbers
Here's another error to pick apart:
com.liferay.portal.OldServiceComponentException: Build namespace X has build number 18 which is newer than 13
Yeah... Google that and you get lots of helpful advice about going into your WEB-INF/src/service.properties file and changing the build.number to something higher. Simple, huh?
But what if that doesn't fix it?
Here's another clue: You've set that build number higher and yet... it still reports the same numbers it did before. What's the deal?
Do you have separate portlet projects installed using the same namespace in your service.xml?
If you do, there's your problem.
You see, when you're building your service.xml file, the namespace you use needs to be unique to the portlet. Otherwise, if you deploy another portlet later that's trying to use that same namespace, Liferay will look at the namespace, compare it to the one you've already installed, and think they're the same service project. If your new one is lower than the old one, Liferay assumes you're trying to replace the same namespace with an older version and won't allow it.
So when you're using the service layer, always make sure your namespace is unique.
Tuesday, November 1, 2011
Video Display Portlet Available on Github
I've just added a new portlet to my Github repo (And the Liferay Community Plugins). It's a Video Display Portlet for Liferay 6 that will play videos from the Document Library, similar to the methods described in some of the earlier posts in this blog.
Here's a link to the page: Link
And the Liferay Download page: Link
Here's a link to the page: Link
And the Liferay Download page: Link
Tuesday, October 11, 2011
In a Portlet: Where's my FacesContextFactory?
Getting this error?
java.lang.IllegalStateException: Application was not properly initialized at startup, could not find Factory: javax.faces.context.FacesContextFactory
Liferay 6
JSF 2.0
Was it working just fine a little while ago?
Well when I got this one all I'd changed was to set the "instanceable" setting in the liferay-portlet.xml file from "true" to "false." Then I started getting this error.
Restarting the portal won't fix this.
Re-installing the portlet won't fix it either.
See, if your portlet was previously instanceable and now it isn't, but you left the portlet on the page when you re-installed, then it blows up all sorts of interesting things. When you make a change like that you have to remove the portlet from the page and drop it back on again.
So to fix this, just remove it from the page, place it back on, and presto! All should be well.
Monday, September 19, 2011
Shibboleth Attributes: What am I getting???
Sometimes it's necessary to know exactly what attributes are being sent by Shibboleth. It may be that you need to know the names of the attributes themselves, or maybe your business rules require knowledge of what institution the incoming users are with, or even what they had for breakfast that morning...
But how to tell what you're getting?
Well, there's a page you can visit on your Shibboleth server that will tell you exactly what attributes and values are being sent. Nice, huh? Problem is there's a little bit of configuration you have to do.
Open your shibboleth2.xml file.
Within that file there should be some Handler tags. Each of these tags allows Shibboleth to display specific pages with specific details on them. Session displays the attribute values we want. You can also use the Status handler for diagnostic purposes, but this information is tightly controlled so you'd need to set the acl attribute of that element to the IP address of the machine you want to view it from.
To see your attributes, just navigate to
https://[domainname]/Shibboleth.sso/Session
That will display the attributes being passed. You could replace Session with Status to see SAML information about your configuration.
Friday, September 9, 2011
ICEfaces 2.0 Components Aren't Rendering!
Yep, I'm making the switch, and if you're searching for this phrase, I bet you are, too.
The thing is, ICEfaces 2.0 is basically re-using the components from ICEfaces 1.8 (Which is why you're using the same namespaces at the top of your XHTML file.) Unfortunately, it does mean that you have to specifically tell your application to use those older components.
Add these lines to your web.xml:
<servlet>
<servlet-name>Resource Servlet</servlet-name>
<servlet-class>com.icesoft.faces.webapp.CompatResourceServlet</servlet-class>
<load-on-startup>1</load-on-startup>
</servlet>
<servlet-mapping>
<servlet-name>Resource Servlet</servlet-name>
<url-pattern>/xmlhttp/*
</servlet-mapping>
And make sure you're importing the icefaces-compat.jar into your app.
For more information, click here.
Wednesday, August 31, 2011
Button Action Not Firing in JSF Part II
Seems there's a lot of old problems resurfacing today.
As I went to test the navigation in my nifty new Messenger portlet I found the buttons doing absolutely nothing. I was using static JSF navigation... Nothing. I tried a test action method and a test button... nothing.
The environment:
Windows 7
ICEFaces 1.8.1
Liferay 6
Tomcat 6
Guess what?
ICEFaces compresses its JavaScript resources when interacting with your browser. Generally if users are expected to use Internet Explorer you have to configure your ICEFaces not to compress those resources because IE can't handle it.
Well it seems Chrome and Firefox can't handle it either these days, at least not in a Liferay 6 environment.
Add this to your web.xml:
<context-param>
<param-name>com.icesoft.faces.compressResources</param-name>
<param-value>false</param-value>
</context-param>
And all will be well.
SEVERE: Error listenerStart Part III
SEVERE: Context [/mybrokenportlet] startup failed due to previous errors
Now things are getting ridiculous...
Now things are getting ridiculous...
Liferay 5.2 (Or Liferay 6... Doesn't matter)
So the gremlins came back on me with a vengeance when I started building a messenger portlet for Liferay. (Think of an internal E-mail system just within the portal. Nifty, huh? I'll put it up on Github when it's done.)
Again, using ICEFaces 1.8.1 and JSF 1.2 I went to deploy my test version of the portlet and *KABOOM* the above error.
So I checked to be sure all of my name references in my config files matched the name of the .war file. Oops! One didn't match... so I fixed that, undeployed the portlet, rebuilt and re-deployed it and...
*KABOOM*
So I went and checked that all of my class references were correctly capitalized in faces-config.xml and just for giggles redeployed it and *KABOOM*
So I went into my web.xml and commented out the listener tag to make it blow up on purpose and see what happened and...
I got a ClassNotFound error on my com.icesoft.faces.webapp.http.portlet.MainPortlet class.
AH-HAH!
Apparently when your .jars are missing Tomcat will throw an error a little different for the missing listener class than for the main servlet class, so beware.
What caused this?
As it turns out, Eclipse wasn't packaging my JSF and ICEFaces .jar files in the WEB-INF/lib folder when building the .war files. You see, I'd started this project on one machine, then moved it over to another and updated my build path references but NOT the Deployment Assembly. I don't know if it makes a difference that the project was first built on Eclipse Ganymede and now I'm working with Eclipse Helios, but either way here's how you fix it when Eclipse isn't including the .jar files you need in your output.
Right Click the project and select "Properties"
Click "Deployment Assembly"
You'll see a list of source items and the Deploy Path they'll be placed in. Make sure that all of your libraries and .jars are correct.
After correcting my .jar file paths, I was able to successfully deploy my project.
P.S. If I'd been building this thing with Maven, I wouldn't have had this trouble...
Still not working? Go on to this post.
After correcting my .jar file paths, I was able to successfully deploy my project.
P.S. If I'd been building this thing with Maven, I wouldn't have had this trouble...
Still not working? Go on to this post.
Monday, August 29, 2011
Projects on Github
So it was suggested in a comment on this post that I upload my code to Github.
So I checked that with my boss and he was cool with it so I created an account there and have uploaded the complete projects for the Shibboleth-Liferay-Hook and Shibboleth-Liferay-Extension to my new page here.
I thought about making these things buildable with Maven but frankly I think the best way to do it is using ant within the Liferay Plugins SDK. I do have other plugin projects that are Mavenized and will post them on Github at some point.
These projects are also available through the Liferay Community Downloads section of the Liferay website.
Enjoy!
Note: I'm not sure how much maintenance I will be doing to these projects. If I make any good changes to the projects here I'll update them on Github and, of course, if anyone finds problems and bugs with them we'll fix 'em, but mostly they're out there to help people figure this stuff out and learn.
Wednesday, August 24, 2011
Shibboleth and Liferay Part 6: The Finishing Touch
This is the bonus episode.

And now it can be on yours, too!
Note the use of the value pair coming from the two classes we modified earlier. Next, we set our userEmail variable to the value stored in Liferay's value pair:
If you've gone through the last 5 posts and have a functioning Shibboleth-Liferay Web SSO setup then you're ready for this step.
You'll need to un-deploy the extension you deployed in the last post. Here's a page that has instructions on how to do so. It isn't like un-deploying portlets or hooks. Also, if you're un-deploying the extension in order to replace it with another, be sure to restart Liferay before attempting to install the replacement!
So at this point we have an Ext plugin that adds a new auto login module to the set already in Liferay. We have configured our portal-ext.properties to use it. All is well... until the IdP team decides to change the names of the attributes that pass the login data along. Now your code breaks because you have that value hard coded in your auto login class.
And as I've said before, nothing is worse than hard coded values. Nothing.
If you go into Liferay's Control panel and click "Portal Settings" from the menu at the left, and then choose "authentication" from the menu on the right, you will see a list of possible Web SSO providers to choose from, and you can choose whether each one is enabled or disabled. Wouldn't it be nice if Shibboleth were one of the options?
Well, it is on mine:
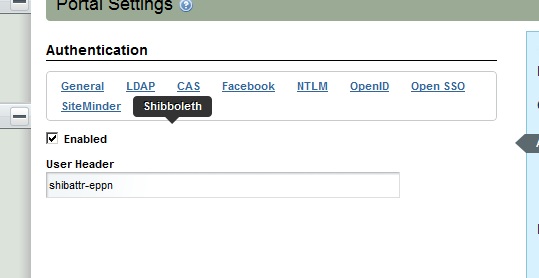
And now it can be on yours, too!
But first we need to revisit that Ext plugin we created in part 5.
You'll be adding two more classes which will be overriding existing classes in Liferay. Liferay stores settings for various elements of the portal in a value pair of classes called PropsKeys and PropsValues. We'll be overriding them both. The purpose of this is to make use of the "Enabled" and "User Header" settings when Shibboleth is selected from the Authentication menu, as pictured above.
"But wait!" You say. "My authentication module is already enabled! I've been using it! How can that be if I've never added this parameter before?"
The way the Liferay uses the auto login modules is by iterating through each of the modules you've enabled in your portal-ext.properties file if you've overridden that value, each time a user opens Liferay. If you look at some of the auto login classes already written in the Liferay source code, you'll notice that each class checks the value of its "Enabled" setting before doing anything else. In a sense, there's a sort of double layer of "on" switches for each of these auto login modules. Since the code we used in part 5 never checks the value of that setting, our module will always run when Liferay looks for it. We want our Shibboleth auto login module to work exactly like the built in modules so we want to match that feature.
In your Ext project, add a new set of folders under docroot/WEB-INF/ext-impl/src:
com/liferay/portal/kernel/util
And copy the PropsKeys.java class from the corresponding location in the Liferay source bundle into util.
What you'll see in this class is a VERY LONG list of public Strings being declared. Add these into it:
public static final String SHIBBOLETH_AUTH_ENABLED = "shibboleth.auth.enabled";
public static final String SHIBBOLETH_USER_HEADER = "shibboleth.user.header";
It doesn't matter where you put them, but since the variables are in alphabetical order I just kept to that approach.
Now you can save that class and add another folder set:
com/liferay/portal/util
also under /src.
From the corresponding folder in the source code, copy over the PropsValues.java file.
You'll see another long list of Strings, similar to PropsKeys. Add these lines:
public static final boolean SHIBBOLETH_AUTH_ENABLED = GetterUtil.getBoolean(PropsUtil.get(PropsKeys.SHIBBOLETH_AUTH_ENABLED));
public static final String SHIBBOLETH_USER_HEADER = PropsUtil.get(PropsKeys.SHIBBOLETH_USER_HEADER);
And save the file.
Now, we need to modify our ShibbolethAutoLogin.java file to make use of these parameters.
In the class variables section, add this line:
String userEmail = "";
We're making userEmail a class variable because we're going to need it inside try/catch blocks. Inside the login() method, under the line where you declared your String[] credentials, declare a new variable:
long companyId = PortalUtil.getCompanyId(req);
It's also a good idea to move the String[] credentials = null; line up to the top of the method now. Delete the old try{ and move it to the top of the method, right under the variable declaration.
The first thing we need to add inside our expanded try block is the check to see if the user has clicked the "Enabled" switch.
if (!PrefsPropsUtil.getBoolean(
companyId, PropsKeys.SHIBBOLETH_AUTH_ENABLED,
PropsValues.SHIBBOLETH_AUTH_ENABLED)) {
return credentials;
}
userEmail = (String) req.getAttribute(PrefsPropsUtil.getString(companyId, PropsKeys.SHIBBOLETH_USER_HEADER,PropsValues.SHIBBOLETH_USER_HEADER));
The last change is a small one. Since we're always initializing userEmail when we declare it, in the if statement that comes next, rather than check for userEmail to be null, we just want to check that it's not empty. When you're done, your class should look like this:
public class ShibbolethAutoLogin implements AutoLogin {
private static Log _log = LogFactoryUtil.getLog(ShibbolethAutoLogin.class);
String userEmail = "";
public String[] login(HttpServletRequest req, HttpServletResponse res)
throws AutoLoginException {
String[] credentials = null;
long companyId = PortalUtil.getCompanyId(req);
try {
if (!PrefsPropsUtil.getBoolean(
companyId, PropsKeys.SHIBBOLETH_AUTH_ENABLED,
PropsValues.SHIBBOLETH_AUTH_ENABLED)) {
return credentials;
}
userEmail = (String) req.getAttribute(PrefsPropsUtil.getString(companyId, PropsKeys.SHIBBOLETH_USER_HEADER,PropsValues.SHIBBOLETH_USER_HEADER));
_log.info("User Login received:" + userEmail);
if (userEmail.equals("") || userEmail.length() < 1) {
_log.error("Invalid or missing user login information from Shibboleth");
_log.error("Data returned from attribute:" + userEmail);
return credentials;
}
credentials = new String[3];
User user = UserLocalServiceUtil.getUserByEmailAddress(PortalUtil
.getCompany(req).getCompanyId(), userEmail);
credentials[0] = String.valueOf(user.getUserId());
credentials[1] = user.getPassword();
credentials[2] = Boolean.TRUE.toString();
return credentials;
} catch (NoSuchUserException e) {
_log.error("No user found to match " + userEmail);
} catch (Exception e) {
_log.error(StackTraceUtil.getStackTrace(e));
throw new AutoLoginException(e);
}
return credentials;
}
}
Save the file, and you can now rebuild and re-deploy that plugin. Make sure you completely remove the old Ext plugin per the instructions on the link provided above!
We're not done yet. We need an interface that will let us access these variables. Create a new hook project. Here's a link to how to do it in case you've never created a hook before.
In your new hook project, create this folder structure under WEB-INF/:
jsps/html/portlet/enterprise_admin/settings/
From the corresponding folders in your Liferay source, copy the file authentication.jsp over.
Hate jsps? Yeah, me too. Maybe one day we can go in and convert this stuff into JSF. For now, we play the hand we're dealt.
What you'll see when you open this file is the code that sets up the Authentication settings in Portal Settings. At the top is yet another long series of variable declarations. Add these to the list:
boolean shibbolethAuthEnabled = ParamUtil.getBoolean(request, "settings--" + PropsKeys.SHIBBOLETH_AUTH_ENABLED + "--", PrefsPropsUtil.getBoolean(company.getCompanyId(), PropsKeys.SHIBBOLETH_AUTH_ENABLED, PropsValues.SHIBBOLETH_AUTH_ENABLED));
String shibbolethUserHeader = ParamUtil.getString(request, "settings--" + PropsKeys.SHIBBOLETH_USER_HEADER + "--", PrefsPropsUtil.getString(company.getCompanyId(), PropsKeys.SHIBBOLETH_USER_HEADER, PropsValues.SHIBBOLETH_USER_HEADER));
These declarations are referencing our friends, the value pairs in Liferay. At last we'll be writing code to set them.
Near the top of the HTML you'll see a <liferay-ui> tag with an attribute called "names." That attribute sets up the list of tab links to choose from in the menu. You should see the names of all the existing Web SSO providers. Just add "Shibboleth" to the end of the list.
Next, we see a series of <liferay-ui:section> tags. Each of these sections corresponds to one of the Web SSO providers. Add a new section to the end that looks like this:
<liferay-ui:section>
<aui:fieldset>
<aui:input inlineLabel="left" label="enabled" name='<%= "settings--" + PropsKeys.SHIBBOLETH_AUTH_ENABLED + "--" %>' type="checkbox" value="<%= shibbolethAuthEnabled %>" />
<aui:input cssClass="lfr-input-text-container" label="user-header" name='<%= "settings--" + PropsKeys.SHIBBOLETH_USER_HEADER + "--" %>' type="text" value="<%= shibbolethUserHeader %>" />
</aui:fieldset>
</liferay-ui:section>
And save the file. Now you can deploy your new hook!
When you go to set these values in the Shibboleth configuration in Liferay, they're pretty self explanatory. Just add the name of the Attribute or Header you're being sent from the IdP in the "User Header" box and make sure the "Enabled" box is checked. Save the values.
Now, if the name of the variable ever gets changed, you can just do a quick update right here! (Just make sure you've left yourself a way to bypass Shibboleth and login with Admin privileges without it!)
This has been a pretty complex undertaking and I have no doubt that I've left something out over the course of these 6 posts. Please don't hesitate to leave comments or contact me with questions, and if I've left any glaring holes in these procedures I'll add them in!
Edit: The complete code for this project can be downloaded as linked in the next post: Here
---
This project incorporates tools whose development was funded in part by the NIH through the NHLBI grant: The Cardiovascular Research Grid (R24HL085343)
Edit: The complete code for this project can be downloaded as linked in the next post: Here
---
This project incorporates tools whose development was funded in part by the NIH through the NHLBI grant: The Cardiovascular Research Grid (R24HL085343)
Tuesday, August 23, 2011
Shibboleth and Liferay Part 5: Extending Liferay
This is part 5 of a series of blog posts detailing an approach to using Shibboleth for Web SSO with Liferay.
This is the fun part if you like writing code.
If you've created Ext plugins for Liferay before this will be a piece of cake. If you haven't, check out this post on how to create an Ext plugin project.
So, create your Ext project. I called mine shibauthentication-ext.
Now, within that project, create a folder structure to match Liferay. We're going after the WEB-INF/ext-impl/src/com/liferay/portal/security/auth folder. That'll be in the docroot folder of your project. Now, if you look at the corresponding folder in your Liferay source code you'll notice a series of auto login classes corresponding to the various Web SSO providers Liferay is designed to interact with out of the box. We're going to build one just like them for Shibboleth.
Your new ShibbolethAutoLogin class should be of package com.liferay.portal.security.auth and it should implement AutoLogin.
Here's the code:
public class ShibbolethAutoLogin implements AutoLogin {
private static Log _log = LogFactoryUtil.getLog(ShibbolethAutoLogin.class);
Note the class we're getting the log from. This will be set in the Liferay Admin screen later.
public String[] login(HttpServletRequest req, HttpServletResponse res)
throws AutoLoginException {
String[] credentials = null;
String userEmail = (String) req.getAttribute("[ATTRIBUTE_FROM_IDP]");
_log.info("User Login received:" + userEmail);
The IdP will send the user meta data by a series of header or attribute names. This is the tricky part because depending on how your IdP is configured, it could come in as either Attributes or Headers. Also, this code is assuming you're getting an E-mail address. It could be a username or user ID depending on your IdP. You'll also need to know the name of the attribute itself.
Sometimes people like to iterate through the Enumeration of Attribues or Headers that come in from the HTTP request to see what's coming in. That's fine, but there's a quirk in the servlet running this that will not show the added Attribute from Shibboleth. You need to specify the name in order to access it, which means you have to get your IdP team to tell you what it is or view the Shibboleth Status page to see the list of what's coming in.
if (Validator.isNull(userEmail) || userEmail.length() < 1) {
_log.error("Did not receive user login information from Shibboleth");
_log.error("Data returned from attribute:" + userEmail);
return credentials;
}
try {
credentials = new String[3];
_log.debug("Company:" + PortalUtil.getCompany(req).getCompanyId());
User user = UserLocalServiceUtil.getUserByEmailAddress(PortalUtil
.getCompany(req).getCompanyId(), userEmail);
_log.debug("UserId:" + String.valueOf(user.getUserId()));
credentials[0] = String.valueOf(user.getUserId());
credentials[1] = user.getPassword();
credentials[2] = Boolean.TRUE.toString();
The credentials array is what gets passed to Liferay with the information about the user to be logged in.
_log.info("Logging in user " + userEmail);
return credentials;
} catch (NoSuchUserException e) {
} catch (Exception e) {
_log.error(StackTraceUtil.getStackTrace(e));
throw new AutoLoginException(e);
}
return credentials;
}
}
Again, your situation may be a little different so it's important to understand how this code works so you can adjust it to fit your needs.
Now, there's one more thing that needs to happen before this will work. You have to go into your portal-ext.properties file and tell it to use this module.
#Shibboleth Auto Login Setup
auto.login.hooks=com.liferay.portal.security.auth.ShibbolethAutoLogin, com.liferay.portal.security.auth.RememberMeAutoLogin
auth.pipeline.enable.liferay.check=false
Last, it's nice to get logging from this module so from in Liferay, logged in as an Admin, go to the Control Panel and then go into "Server Administration." Click "Log Levels."
Click "Add Category."
In the box, add com.liferay.portal.security.auth.ShibbolethAutoLogin and click "save."
I'm still working on a hook that would allow the user to select Shibboleth from the Authentication configuration menu just like any other SSO provider. Once it's finished I'll post it here as a final step to make this solution truly integrated.
---
This project incorporates tools whose development was funded in part by the NIH through the NHLBI grant: The Cardiovascular Research Grid (R24HL085343)Shibboleth and Liferay Part 4: Configuring Tomcat
This is part 4 of a set of blog posts detailing the setup to have Shibboleth provide Web SSO for Liferay.
By this point you've installed Shibboleth, configured Apache and setup your connector between Apache and Tomcat.
Notice, in the last blog post, that we set the port for the AJP connector to port 8009. You're going to need to tell Tomcat to listen on that port. Open up your [Tomcat Home]/conf/server.xml file. About halfway through the file you'll see a few <Connector> tags that define the ports Tomcat is set to listen to. Usually the connector for port 8009 is available by default, which is fine, but notice there's a setting in it: "redirectPort="8443" that redirects any request on port 8009 to 8443... But by default, the Connector for port 8443 is commented out. Go figure.
First, add the following setting to the Connector for port 8009:
tomcatAuthentication="false"
Next, uncomment the Connector tag and settings for port 8443. You'll also need to add the keystoreFile setting to point to the location of your SSL Certificate keystore, as well as the keystorePass. If you created your own self-signed certificate for testing, then you know these values. Otherwise you will need to obtain them from whomever set it up.
Shibboleth and Liferay Part 3: Connecting Apache to Tomcat
This post is the third part in a series describing how to set up Shibboleth as a Web SSO provider to Liferay. By this point you've installed Shibboleth onto your server and have configured Apache to work with it.
Apache is a web server, not a servlet container. Liferay (Or whatever Java based application you're protecting with Shibboleth) must be run in a servlet container. The problem is that Shibboleth only knows how to interact with Apache. Thus, we need to have Apache deal with Shibboleth but still pass requests along to Tomcat.
In order to handle passing requests back and forth between Apache and Tomcat, you'll need to add a module to Apache that will do this for you. If you do a web search on connectors between Apache and Tomcat you'll see a lot of mod_jk and mod_proxy coming up. Most of it seems to revolve around mod_jk.
You do NOT need to use mod_jk with Tomcat 6 and Apache 2.2. You can, but DON'T. It's much more complex to configure, it may not already be installed in your Linux (meaning you get the fun of doing that yourself) and it's not going to be supported much longer (if it even still is.) Just use mod_proxy_ajp.
Seriously.
Proxy Settings
Now, if your httpd.conf contains a separate file for setting up proxies, it's probably called something like proxy_ajp.conf. If not, create it. Open it up. (Make sure your httpd.conf file includes this one, per the previous blog post.)
At or near the top of the file should be the line
LoadModule proxy_ajp_module modules/mod_proxy_ajp.so
This loads the mod_proxy_ajp.so module into Apache on startup.
Make sure the following lines are in the file:
ProxyRequests Off
ProxyPass / ajp://localhost:8009/
ProxyPassReverse / ajp://localhost:8009/
<Proxy *>
Order Deny,Allow
Allow from All
</Proxy>
Now, this will only work if your Liferay is installed as the ROOT application in your Tomcat, as it is in the bundle. If it isn't, you'll need to specify the name of the folder where your Liferay is, for example:
ProxyRequests Off
ProxyPass / ajp://localhost:8009/myliferay/
ProxyPassReverse / ajp://localhost:8009/myliferay/
<Proxy /myliferay/>
Order Deny,Allow
Allow from All
</Proxy>
This also works, of course, for whatever web application you're protecting with Shibboleth.
Now you can save and close that file.
To be continued...
Shibboleth and Liferay Part 2: Configuring Apache
This is part 2 of a set of blog posts detailing the procedure for setting up Shibboleth to provide Web SSO functionality to Liferay.
This is the part that sounds a LOT more complicated than it is.
Apache's configuration is handled in a file called httpd.conf. This file is usually found in the/etc/httpd/conf directory.
There are a few settings in this file we need to pay attention to, but keep in mind that often additional configuration items are kept in separate files and imported into httpd.conf. This allows the user to more easily keep track of related configuration items without having to navigate through one, massive file. if that's the case on your server, then somewhere in your httpd.conf file (usually near the beginning) there should be a statement that looks like this:
Include conf.d/*.conf
That statement is telling Apache to include all the files in the subdirectory conf.d that end in .conf. Yours should be similar. It may also include specific individual files.
General Settings
Open up your httpd.conf file and find your way to the ServerName setting. Set this to the name of the server. That's NAME not IP ADDRESS. The next setting below that should be UseCanonicalName. Set that to "On" in order to get the server to use the ServerName you just set. So if our server is named test.awesome.server.dude then your configuration should look like this:
ServerName test.awesome.server.dude
UseCanonicalName On
And leave the rest alone... Maybe. If your configuration is spread out over multiple separate configuration files as described above, then the rest of this will probably be located in those files. Otherwise stay in httpd.conf to do the rest.
Shibboleth Settings
Next, you should have a file called shib.conf in the directory where all of your other Include files are. It will have been pre-generated for you in some cases by the Shibboleth installation, otherwise these settings should appear in your httpd.conf file. Most of these can be left alone, but the Location tag is the one we're interested in. When Liferay is bundled with Tomcat it is the ROOT application, so for the location in the following setting, we just use / alone.
<Location />
AuthType shibboleth
ShibRequestSetting requireSession 1
require valid-user
</Location>
If your Liferay were installed in Tomcat as some other context, then the name of the folder in [Tomcat Home]/webapps/ would be the correct Location setting.
And that's it for the Shibboleth configurations in Apache.
To be continued...
Tuesday, August 16, 2011
Shibboleth and Liferay Part 1: Installing Shibboleth
So here we go... A topic everybody seems to search on and nobody has a truly complete source of information for. Plenty of guides exist out there for setting up Apache, installing Shibboleth, setting up mod_proxy...
sudo wget http://download.opensuse.org/repositories/security://shibboleth/CentOS_5/security:shibboleth.repo -P /etc/yum.repos.d
sudo yum install shibboleth.x86_64
Some of those sites are great, some of them not so much... But the problem is they often assume a LOT about your knowledge of the subject or how your server is configured, and leave out many things important to new people.
That's the sort of problem that led to this blog. So often, blog posts, articles and forum posts are more about showing off than about actually helping people out. Figuring this thing out has been downright PAINFUL, and I want to spare the next guy by sharing lessons learned.
Oh, and many of the links out there referencing the Shibboleth Wiki are broken. They still link to a site that gives you a new URL for the Shibboleth Wiki, but you lose the specific item you were trying to read.
The project we'll be doing here will be an effort to set up Liferay to be protected by Shibboleth as a Web SSO service provider. This will be a series of blog posts detailing each step. Some of these steps aren't unique to Liferay or Tomcat so I'll break them up so if, for example, someone is looking for ways to connect Apache to Tomcat but isn't using Liferay, they can still benefit from this.
If you've been working with Liferay in just Tomcat (Or Oracle or Glassfish or whatever) you may not have had to interact with Apache. Apache is the quiet little web server that comes bundled with Linux and usually stays out of Tomcat's way. Well, now Apache is going to OWN Tomcat. Seriously. When we configure this thing Apache will decide what requests get sent to Tomcat and which ones don't. Tomcat's just going to have to learn to like it.
Here's how it works:
The user makes a request to the server. Shibboleth, having been configured to watch for this request, intercepts it and redirects the user to a separate authentication site. The user logs in using their credentials. Once they're authenticated, the request returns to the original server and Shibboleth then allows the request to proceed. Normally, with a site running under Apache, the request is turned over to Apache and the requested page is transmitted to the client. In the case of a request made to a servlet, more needs to happen. Apache will forward the request along to Tomcat, which will then handle it normally.
Technically, there are two halves of Shibboleth... The Service Provider (SP) and the Identity Provider (IdP). We're only going to worry about the SP here because that's the part that you, the person who's responsible for building this thing, are responsible for. Typically you'll be setting up a site that authenticates through a pre-existing IdP anyway so that part will already be done.
So our software today:
Operating System: (Linux) CentOS 5.6
Web Server: Apache 2.2.3
Web SSO Provider: Shibboleth 2.0
Servlet Container: Tomcat 6.0.29
Portal: Liferay 6.0.6
Step 1: Install Shibboleth
First thing's first... Install Shibboleth. If you're using the same OS I am, you can run this command:
sudo wget http://download.opensuse.org/repositories/security://shibboleth/CentOS_5/security:shibboleth.repo -P /etc/yum.repos.d
then navigate to /etc/yum.repos.d and run this command:
If you're not, here's a WORKING link to the Shibboleth Wiki Linux install page.
Now, there are a couple of folders where log files will be written, and you need to make sure that the directory permissions are set such that Shibboleth can use them. These directories are
/var/log/httpd and
/var/log/shibboleth
The files that will be created are /var/log/httpd/native.log and /var/log/shibboleth/shibd.log. Don't create those files... Shibboleth will handle that. This is just so you know.
There is a file, located in /etc/shibboleth called shibboleth2.xml. This file contains the settings to allow Shibboleth to find and use the specific data items that control your authentication. In most cases, if you're working with a pre-existing IdP this file may be provided to you by the team that is responsible for that IdP. If not, a sample file is created for you that you can modify to your needs.
The first important part of that file is the RequestMapper section. It will look like this, assuming Liferay is installed in the ROOT and using the server name we came up with above.
<RequestMapper type="Native">
<RequestMap applicationId="default">
<Host name="test.awesome.server.dude" port="443" scheme="https">
<Path name="/" authType="shibboleth" requireSession="true"/>
</Host>
</RequestMap>
</RequestMapper>
Now, if this file wasn't provided to you by your IdP personnel then you're going to have to configure that part yourself. After RequestMapper is the ApplicationDefaults section. The opening tag for that section should look like this:
<ApplicationDefaults
entityID="https://test.awesome.server.dude/shibboleth"
REMOTE_USER="eppn persistent-id targeted-id"
attributePrefix="AJP_">
Inside this Element is another tag, <Sessions> which has yet another inside that, which we need to configure:
<SSO entityID="https://youramazingidpprovider/idp/shibboleth"
discoveryProtocol="SAMLDS" discoveryURL="https://ds.example.org/DS/WAYF">
SAML2 SAML1
</SSO>
These settings will vary depending on how the IdP is configured, and I'm afraid configuring an IdP is beyond the scope of this blog. There may be additional configuration items as well. If you're stuck having to set that up too, here's a link to the Shibboleth IdP setup page.
Save that file and be sure to start Shibboleth.
sudo /usr/sbin/shibd -fc /etc/shibboleth/shibboleth2.xml
To be continued...
Wednesday, August 10, 2011
Open Source vs. Proprietary Solutions
I haven't posted in a while because we've been working on a new portal that will use Shibboleth as the authentication provider.
Once it's up and running I plan to share the details here in this blog, but for now I can tell you that if ever there was a perfect example of the stark contrast between building websites in the open source world and building them in the proprietary software world, this is it.
I used to be a Microsoft .NET developer. I loved C# and hated having to code in VB.NET or J#. In any case, web development and associated activities in the .NET world are much, much easier than in the Java world. This is both good and bad.
It's good, in that it allows for people of a relatively lower skill level to contribute and fill a niche where you need decent websites built but don't really need for every one of them to be a web guru. It's also bad, in that it really hides a lot of what's going on from the developer, and that can be a real disadvantage if the scope of their responsibilities change to the point where they need to know it.
The Java world is a world of open source, of a thousand solutions to any given problem and a world of completely unshackled creativity. Good stuff, but you'd better know what you're doing or it's amazing how fast you can get in over your head. A thousand solutions to any problem may sound great, except that there's really no way to know which solution is best for you without a thorough understanding of what's going on and what to do with it.
So it has been with this portal project.
My initial plan was to build the portal and have it accessible by Shibboleth using the casshib extension. You see, Liferay doesn't come with out-of-the-box compatibility with Shibboleth (at least, not explicitly) but it does come with explicit support for CAS. Casshib sort of acts as an adapter so you can use Shibboleth to provide the authentication and then pass it to Liferay as if it were coming in the format for CAS.
Making casshib work in a case like this is a configuration nightmare of epic proportions if you've never worked with these things before.
If you're a Liferay developer, and you aren't afraid to open up the Liferay source code and tinker with it a little, there is absolutely no earthly reason to use casshib. No offense to you casshib guys. Your tool would be very useful in cases where an app absolutely had to use CAS but all that's available is Shibboleth. With Liferay however, it does NOT absolutely have to use CAS over Shibboleth.
Converting Liferay to play nice with Shibboleth is surprisingly easy, and once I've had the opportunity to test the code and procedure I'll post the details here. In short, my approach at this point has been to create a Liferay Hook Plugin (to modify the Authentication configuration page) and an Extension Plugin (to add the code to handle Shibboleth) and make the appropriate configuration changes in portal-ext.properties.
The hard part has been getting Shibboleth, Apache and Tomcat to work together with SSL. This too is a problem with a thousand solutions and I expect to have locked ours down in the next couple of days.
If this had been a SiteMinder authentication setup using IIS and a SharePoint portal or something, this all would probably be very easy and quick. The downside is that I'd have learned very little about how these things work, and it would have cost us a whole LOT of money to get there. I don't mean that as a criticism of Microsoft, only that for me personally, I feel like a stronger developer for having had this experience, and I'm glad of it.
Tuesday, June 21, 2011
Button Action Not Firing in JSF
We see this one a LOT.
The action listener in JSF isn't complicated at all and yet it seems like half the time something as simple as clicking a commandButton can cause problems.
Today's Example:
Liferay 6.0.6
Tomcat 6
Windows 7
ICEfaces 1.8.1
Sun JSF 1.2
Some code from the view.xhtml page:
<ice:selectManyMenu style="width:150px;" value="#portletBacking.currentsite}">
<f:selectItems id="siteList" value="#{sites.sites}" />
</ice:selectManyMenu>
<ice:commandButton actionListener="#{portletBacking.add}"
name="addButton" type="submit" value="Add"/>
And the add() method from the backing bean:
public void add(ActionEvent e){
System.out.println("Adding...");
//A bunch of processing...
}
Clicking the button did NOTHING. It didn't even print the "Adding..." message to standard output. Why? Was the action method set up properly? Yes. Was the backing bean registered in faces-config.xml? Yes.
What happens sometimes is that JSF gets stalled when there's an incorrect return type on a control. One way to figure out which control is causing the problem is to comment out the page controls and add them back in, one at a time, until the problem happens again. That's what I did, and in this case the flaw was in the ice:selectManyMenu control. Here's the code that was linked to the value:
public void setCurrentsite(String currentsite) {
this.currentsite = currentsite;
}
public String getCurrentsite() {
return currentsite;
}
See the problem?
The ice:selectManyMenu doesn't take a String value. It takes a String[]. If I had been working with an ice:selectOneMenu this would have been correct. All I had to do was fix the code to use a String[] instead:
public void setCurrentsite(String[] currentsite) {
this.currentsite = currentsite;
}
public String[] getCurrentsite() {
return currentsite;
}
And voila'! The action fired when I clicked the button.
So if you're having this problem and everything else seems right, start taking a closer look at the other controls on the page.
If that doesn't fix it, take a look at this.
If that doesn't fix it, take a look at this.
Monday, June 13, 2011
Creating a Liferay Portlet From Google Web Toolkit
Yes, you can do it.
Now, I'm still in the process of refining the method but here's a quick and dirty approach. You just have to remember:
The Environment:
Liferay 6.06
Tomcat 6.0.29
Windows 7
Google Web Toolkit
*This should work on Liferay 5 as well but I haven't tried it.
First, if you're an experienced GWT developer then you already know how to build and compile your code. If you aren't, complete this tutorial first.
Once you've "compiled" your GWT project you'll need an empty Liferay portlet project to transplant your GWT project into. Go ahead and create one using the Liferay SDK.
Now that you have your empty Liferay portlet and your compiled GWT project, you have everything you need.
Suppose our project is called SuperPortlet.
<%@ taglib uri="http://java.sun.com/portlet_2_0" prefix="portlet" %>
<portlet:defineObjects />
*Note: This assumes the .css file is in the /docroot folder. If you have a subfolder with your .css just put it there and be sure the path is defined correctly in the above tag.
Again, adjusting that file path depending on how you organize your portlet.
Be sure to copy over any images or other .css and .js files you have (defining each in its own separate tag in the liferay-portlet.xml file) and you should be ready to rock & roll. I did this in Eclipse and exporting the project to a .war file gave me a deployable .war that worked great.
Now, I'm still in the process of refining the method but here's a quick and dirty approach. You just have to remember:
- GWT applications "compile" Java source code into JavaScript.
- Liferay Portlets have their JavaScript source files defined in the liferay-portlet.xml
The Environment:
Liferay 6.06
Tomcat 6.0.29
Windows 7
Google Web Toolkit
*This should work on Liferay 5 as well but I haven't tried it.
First, if you're an experienced GWT developer then you already know how to build and compile your code. If you aren't, complete this tutorial first.
Once you've "compiled" your GWT project you'll need an empty Liferay portlet project to transplant your GWT project into. Go ahead and create one using the Liferay SDK.
Now that you have your empty Liferay portlet and your compiled GWT project, you have everything you need.
Suppose our project is called SuperPortlet.
- Copy your war/WEB-INF/appengine-web.xml and war/WEB-INF/logging.properties files into the empty portlet's WEB-INF folder.
- Copy your /SuperPortlet folder into the empty portlet's /docroot folder.
- Copy your SuperPortlet.css and SuperPortlet.html files into the portlet's docroot folder.
- Rename SuperPortlet.html to view.jsp
- In your view.jsp file, there are a few tags that need to go away. In portlets we don't need <html>, <body>, <title> or <head> tags. Blow them away.
- You don't need the <link> or <script> tags either. We're going to specify our .css and .js files elsewhere.
- Add this to the top of your view.jsp file:
<%@ taglib uri="http://java.sun.com/portlet_2_0" prefix="portlet" %>
<portlet:defineObjects />
- Now, open your liferay-portlet.xml file.
- In the <header-portlet-css> tag, add the path to the .css file. In this case the line would look like this:
*Note: This assumes the .css file is in the /docroot folder. If you have a subfolder with your .css just put it there and be sure the path is defined correctly in the above tag.
- This is the tricky part... The auto-generates portlet defines a <footer-portlet-javascript> tag. If you put the path to your SuperPortlet.nocache.js file in there, it won't work. You need to change "footer" to "header."
Again, adjusting that file path depending on how you organize your portlet.
Be sure to copy over any images or other .css and .js files you have (defining each in its own separate tag in the liferay-portlet.xml file) and you should be ready to rock & roll. I did this in Eclipse and exporting the project to a .war file gave me a deployable .war that worked great.
Friday, June 10, 2011
java.lang.ClassCastException: [Ljava.lang.String; cannot be cast to java.lang.String
If you see this error:
and you're using Liferay 6 with ICEfaces 1.8, then maybe this will help you.
The environment:
Liferay 6.06
Tomcat 6.0.29
Windows 7
ICEfaces 1.8.1 on JSF 1.2
The error is the result of having the out-of-the-box Chat portlet running at the same time as an ICEfaces portlet. I haven't worked out yet exactly why, but what's hapening is the PollerServlet in Liferay is having its getContent() method called and the pollerRequestString is giving it indigestion.
Liferay expects to be able to take the pollerRequestString, deserialize it, and cast it into a Map. For whatever reason, when there's an ICEfaces 1.8 portlet present, it gets a string it can't handle. Since Liferay didn't check the cast in the code for this Servlet, it throws the above error every 60 seconds. This can make for a very full log file in a very short period of time.
The offending line of code:
Map<String, Object>[] pollerRequestChunks =
(Map<String, Object>[])JSONFactoryUtil.deserialize(
pollerRequestString);
What to do?
Well, one suggestion on the Liferay forum for this issue is to remove the Chat portlet. That will make the errors go away, but it isn't much of a solution when you want to actually use the Chat portlet.
What I did was a quick & dirty "fix" using the Ext plugin system Liferay 6 provides.
Now, the Liferay In Action book from Manning has a pretty good section on setting up an Ext plugin and a good overall explanation of how Ext plugins work, but for some reason he seems to be in love with using Struts examples. He even sort of hangs a lampshade on that by saying that its 99% likely that if you're using the Ext plugin it's because you want to modify the Struts behavior.
Well I guess this is that 1% when we're not. What now?
We go in and use brute force, of course!
The author also strongly encourages the reader to extend, not replace, the classes in Liferay. The logic is that if you replace a class, then Liferay subsequently performs an update it will break your code. Well, he also acknowledges that your Ext plugin will probably break anyway so I don't see this as a major risk beyond what we're already doing. Further, all we're doing here is a simple fix, not changing any big functionality, so I'm going ahead and replacing.
Using either your Eclipse Helios (with Liferay plugin) or Liferay 6.0 SDK create a new Ext plugin project.
Know how?
You should have the Liferay 6 SDK set up on your machine. For details on that, you can check out one of my earlier posts. From there, if you're not using Eclipse, you can navigate into the ext folder and type
create uberext "Uber Extension"
(Substitute your own names)
That creates the plugin structure for you in a new folder in the ext folder.
In Eclipse, it's the same idea and it'll even create the plugin folder in your SDK ext folder, exactly as if you'd done it the command line way. (Assuming you've set Eclipse to use your SDK. If not, you need to do that first.)
To set Eclipse to use your SDK:
- Open Eclipse
- Click the dropdown arrow next to the Create New Server button. It should be right under "Search" on your Menu bar and it's the icon that looks a little like Oscar the Grouch's Trash Can. (Make of that what you will.)
- Select "New Liferay SDK"
- Follow the prompts to add the new SDK to your Eclipse environment.
Now you can use Eclipse to create your plugins and use the supplied Ant build scripts from the SDK.
Now to create your new Ext project:
- Either click the Liferay icon that looks like a power plug or go to File >> New >> Liferay Project
- Choose a project name and Display name, entering them in the appropriate fields.
- Under Plugin Type, select Ext
Eclipse will, behind the scenes, run the command that creates the project in the ext folder just as if you'd done it there yourself. It also displays the project in the navigation pane at the left.
So, to fix the above error:
In the source code for the plugin, under the docroot/WEB-INF/ext-impl/src folder, create your version of the com.liferay.portal.poller package. Inside it, create your PollerServlet class.
Now copy/paste the code from the original source to your version.
What I did (and this is a quick and dirty solution, I leave a more elegant approach to you) was to take the offending line of code above and replace it with this:
Map<String, Object>[] pollerRequestChunks;
try{
pollerRequestChunks =
(Map<String, Object>[])JSONFactoryUtil.deserialize(
pollerRequestString);
}catch (java.lang.ClassCastException e){
return null;
}
This handles the exception being thrown by the bad cast. Would it be better to check the input and handle it more gracefully? Yes it would, especially because this will still result in a log entry every minute of "Current URL /poller/send generates exception: null" as the method is returning a null value, but the idea here is to show how to do a simple Ext plugin that isn't related to Struts. Besides, it's still better than a stack trace dump every minute.
Now to create the deployable war...
The Liferay SDK has an ant deploy command that you can run from the command line in the folder for your ext project or you can double click it in the Ant window in Eclipse. Either way, if you've configured your SDK environment properly the result will be an Ext plugin that's been compiled, built as a .war file, and copied to the deploy folder in your Liferay instance.
Liferay will install it, but because we're making changes to the compiled code we will need to restart Liferay to make the changes take effect.
This is the quickest, simplest and dirtiest way to build an Ext plugin. Normally we'd do it with more finesse than that but this should be enough to get you started.
Thursday, June 9, 2011
Can't find bundle for base name javax.faces.Messages, locale en_US
This is another one of those error messages that, if you Google it, will bring back a LOT of message board posts and Jira entries and most of them won't help.
This one is what you get when you try and submit a JSF form.
This post will talk specifically about times when this error message is thrown and the first two lines look like this:
java.util.MissingResourceException: Can't find bundle for base name javax.faces.Messages, locale en_US java.util.ResourceBundle.throwMissingResourceException(ResourceBundle.java:1427)
This one is what you get when you try and submit a JSF form.
I'm using:
Liferay 6.0.6
ICEfaces 1.8.1
Windows 7
In my case, I was modifying a portlet originally built for Liferay 4 and ICEfaces 1.7 to make it run on Liferay 6.
What was happening is the message-override.properties file wasn't being found. Now, a lot of people have a lot of different ideas on what folder that file goes in, and yet seldom mention the other half of the problem. You see, you have to tell JSF about this file, and that means going into the faces-config.xml.
<message-bundle>messages-override</message-bundle>
And make sure that goes in your <application> block.
And where should that file be? In WEB-INF/classes.
"So, how do you get that in Maven?"
Getting this messages-override.properties file into WEB-INF/classes isn't hard, but it isn't intuitive either if you're not used to dealing with Maven. In your project file structure, create a folder called resources under main. Your file goes there. When Maven is building your .war file, it'll take whatever is in resources and put it in WEB-INF/classes for you.
Friday, May 6, 2011
JSF/ICEfaces Validation Messages and Liferay Portlets
Turning this:

Into this:

Getting JSF and Liferay to play nice together in the sandbox is sometimes an adventure. Even things that should be straightforward sometimes... aren't.
Take validation. JSF 1.2 has a pretty nice validation component. It's easy to use and has some built-in validators with custom validators easy to handle.
There are some things to watch out for, however, especially when using this functionality in your portlets.
Our environment today:
Liferay 5.2
ICEfaces 1.8.1 (built on JSF 1.2)
Let's say we have 3 fields... two of them are for inputting a name (first and last separately) and one is for an E-mail address. All 3 fields are required and we're going to use a regex to validate the E-mail address is properly formatted.
The text fields are simple.
<ice:inputText id="lname"
label="Last Name"
partialSubmit="false"
required="true"
value="#{backingBean.lname}"/>
Notice the required="true" attribute. That tells JSF to use its built-in required field validator to check this field during the Process Validation phase of the JSF lifecycle. (That isn't just technical mumbo-jumbo, boys and girls. It's going to matter later.)
We do the same for first name.
<ice:inputText id="fname"
label="First Name"
partialSubmit="false"
required="true"
value="#{backingBean.fname}"/>
Now, for E-mail address we don't just want it to be required. We also want to check to be sure the format is correct.
<ice:inputText id="email"
label="E-mail Address"
partialSubmit="false"
required="true"
validator="#{backingBean.validateEmail}"
value="#{backingBean.email}"/>
Notice that we used the required="true" attribute, but we're ALSO adding our custom validator with the attribute validator="#{backingBean.validateEmail}"
Now, sometimes it's better to create a separate validator class to define a bean whose sole purpose is validation. In this case, we're only defining a single custom validator so there's no need to create a separate class just to handle it. We certainly could have, and in a more complex form with more custom validators we would.
The custom validator method we're calling here is pretty straightforward.
public void validateEmail(FacesContext context, UIComponent toValidate, Object value) {
String email = (String) value;
String regex = "regexstring";
if(!email.matches(regex)){
((UIInput)toValidate).setValid(false);
FacesMessage message = new FacesMessage("Invalid Email Adddress");
context.addMessage(toValidate.getClientId(context), message);
}
}
I left out the actual regex string, replacing it in the code with just regexstring. I did this because there are a lot of different ways to do this and you may have a favorite you'd prefer. Either way, I stink at writing regex strings so anything I put there would be written by somebody else and I'm not gonna plagiarize. Here's a nice regex library where you can find all sorts of user uploaded regex strings as well as a regex tester.
So here's what's happening...
We take 3 parameters in our validator method. The FacesContext object, the UI component that's triggering the validation, and the Object that is the subject to be validated. We're casting that Object to a String and comparing it to our regex. If it matches, life goes on as normal. if it doesn't, the UI component is marked as being invalid and we add a new FacesMessage to the FacesContext object.
So if any is not valid, the JSF lifecycle bypasses all but the Render Response phase.
Nice, huh?
Now all we need is to display the validation messages back to the user. There are two ways to do this. The first way is to have a message for each control, so that it can be placed right next to the control. This is done by means of an <ice:message/> tag with the for attribute set to the control being validated. You can also display all of the validation messages in one place with the<ice:messages/> tag which has attributes for setting the display layout and so on.
We're not done yet, friends.
Here's the problem. FacesMessage objects have a severity associated with them. By default, the built-in required field validator is of SEVERITY_ERROR. In our custom validator we didn't set a severity, did we? Well the default is not SEVERITY_ERROR. That means it's going to be different from the required validators.
Why is that a problem?
Because Liferay assigns a different look and feel to the way it displays these messages based on severity.
Normally, we could just set the severity level of the message when we create it in our custom validator so it matches. At least then they'd all look the same. Personally, I don't really like the big red box look. The default severity level is handled by Liferay as a SEVERITY_INFO which is a much more pleasant blue box.
Liferay also sometimes tacks on a lot of extra, very user unfriendly info like the uid for the portlet instance and we don't want all that displaying in the error message.
Note: it only does this for the built-in JSF validators. When we create our own, it's no problem.
That means in order to get them all the same, we need to override the messages created by the built-in validators.
I prefer to do this right after the Process Validation phase.
That means creating a phase listener.
public void afterPhase(PhaseEvent pe) {
if (pe.getPhaseId() == PhaseId.PROCESS_VALIDATIONS) {
FacesContext facesContext = FacesContext.getCurrentInstance();
Iterator messages = facesContext.getMessages();
while(messages.hasNext()){
String control, detail;
FacesMessage message = messages.next();
message.setSeverity(FacesMessage.SEVERITY_INFO);
reformatMessage(message);
}
}
}
So in our phase listener (Which you did remember to register in the faces-config.xml, right?) we get the messages in the FacesContext. We then turn each of them to SEVERITY_INFO for that nicer blue look. Then we reformat each message...
private void reformatMessage(FacesMessage message){
String[] messageElements = message.getSummary().split(":");
if(messageElements.length > 1){
message.setSummary(messageElements[messageElements.length - 3] + " field is blank. Please enter a value.");
}
}
As you can see from the image at the top of this post, the exact length of the messages isn't the same so we need a little flexibility in our String handling here. We also want it to ignore our custom messages so we have it ignore the messages that don't contain that ":" in them.
Subscribe to:
Posts (Atom)